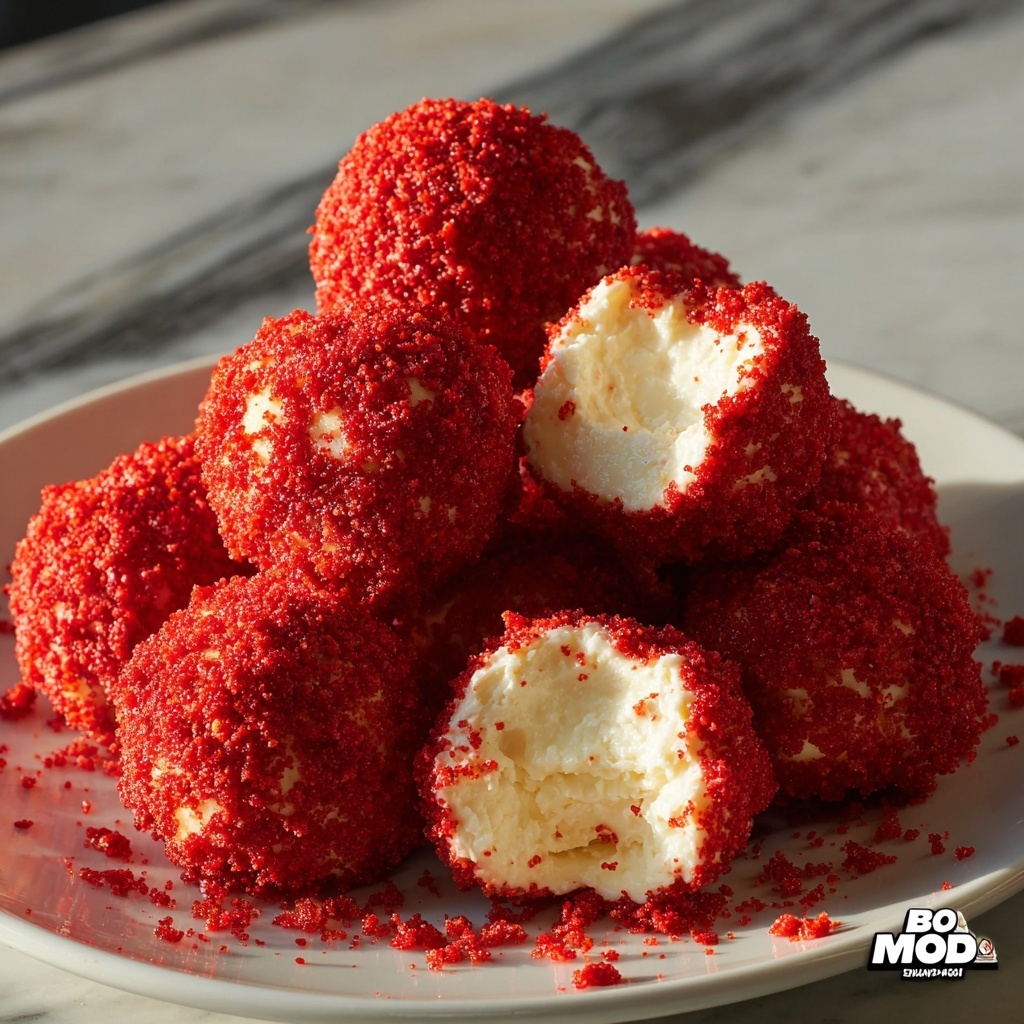
If you have a sweet tooth craving that combines the lush creaminess of cheesecake with the vibrant, chocolatey charm of red velvet cake, the Red Velvet Cheesecake Bites Recipe is going to be your new obsession. These delightful little treats pack all the velvety goodness of your favorite cake into bite-sized morsels that are as fun to eat as they are beautiful to behold. Perfectly moist, luxuriously creamy, and wonderfully easy to make, this recipe brings together simple ingredients to create a dessert that’s perfect for celebrations or a cozy night in.
Ingredients You’ll Need
Every ingredient in this Red Velvet Cheesecake Bites Recipe plays a starring role in creating that perfect balance of texture and taste. From the classic red velvet cake base that gives the bites their stunning color and rich flavor, to the creamy cheesecake layer that melts in your mouth, each component is essential for a flawless result.
- Red velvet cake mix: This is the foundation, bringing that signature deep red color and cocoa flavor that define these bites.
- Ingredients on cake mix packaging: Usually water, eggs, and oil; these ensure the cake bakes just right.
- Cream cheese (16 ounces, room temperature): Adds the velvety, tangy creaminess essential for the cheesecake component.
- Butter (4 tablespoons, room temperature): Adds richness and helps achieve a smooth, luscious texture.
- Powdered sugar (1/2 cup): Sweetens the cheesecake mixture without any grittiness.
- Graham crackers (2 cups, crushed): Provide a subtle crunch and a buttery, caramel-like flavor that complements the cream cheese.
- Vanilla extract (1 teaspoon): Enhances all the other flavors, tying them together beautifully.
How to Make Red Velvet Cheesecake Bites Recipe
Step 1: Preheat and Prepare Pans
Start by heating your oven to 350°F and greasing two 8-inch cake pans. This step ensures your red velvet cake will come out perfectly, without sticking, and set the stage for your cheesecake bites.
Step 2: Bake the Red Velvet Cake
Follow the instructions on your cake mix packaging to prepare the red velvet batter, then bake it in the greased pans. Once out of the oven, allow the cakes to cool completely – this is crucial for the next steps where you’ll be turning the cake into a crumbly coating.
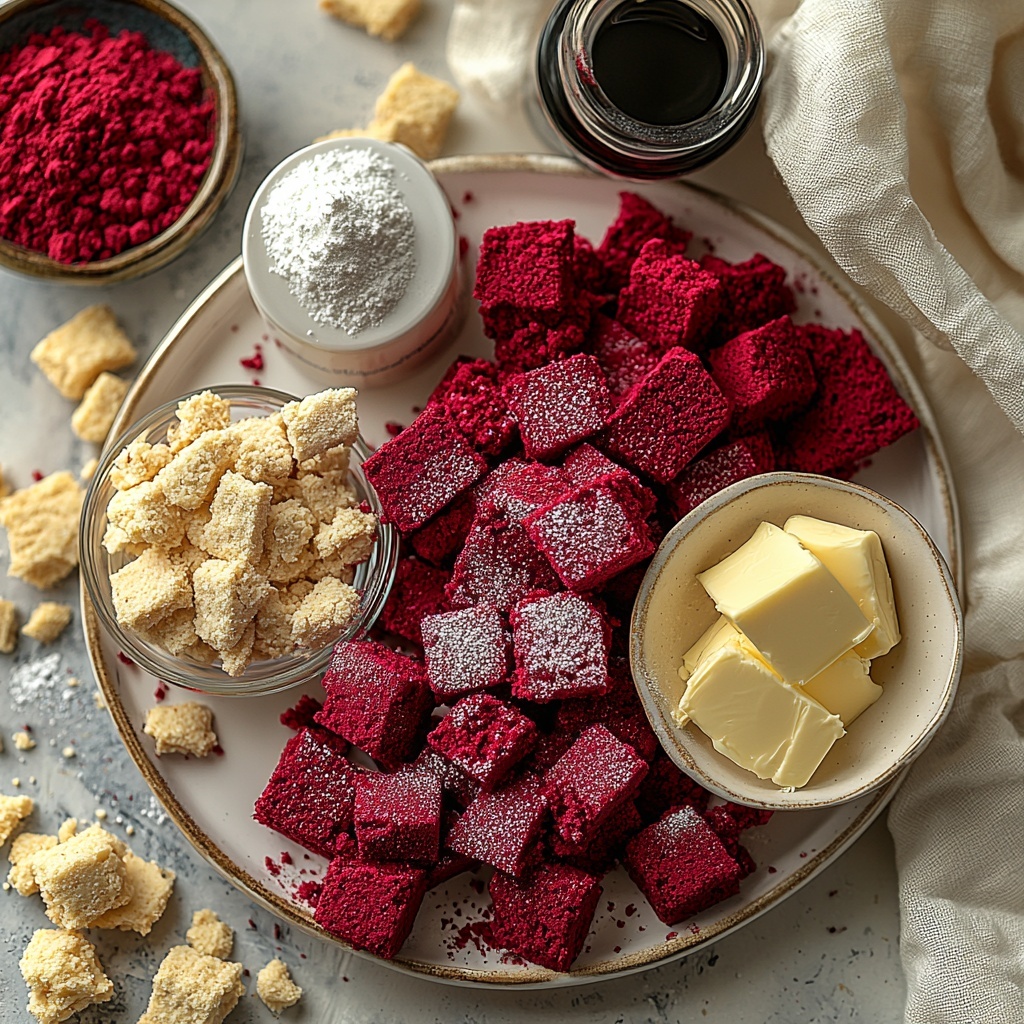
Step 3: Crumble and Dry the Cake
Once your cake is cooled, crumble it into coarse pieces to get the right texture for coating. If the cake feels moist or sticky, pop it back in the oven for a few minutes to dry out slightly; this helps the crumbs cling perfectly to the cheesecake bites later.
Step 4: Make the Cheesecake Mixture
In a large mixing bowl, beat together the cream cheese, butter, and powdered sugar. Whip this trio until light and fluffy—it’s this mixture that gives your bites that irresistible cheesecake texture.
Step 5: Add Crunch and Flavor
Gently fold the crushed graham crackers and vanilla extract into the cheesecake mixture. The graham crackers add a subtle crunch and depth of flavor that pairs beautifully with the cream cheese and cake crumbs.
Step 6: Form and Chill the Bites
Scoop generous spoonfuls of the mixture and roll them into balls, about an inch to an inch and a half in diameter. Pop these into the fridge for an hour to firm up, which makes them easier to coat in the red velvet crumbs.
Step 7: Coat with Crumbled Red Velvet Cake
Once chilled, roll each ball in the crumbled red velvet cake until fully coated. This final step gives your cheesecake bites that stunning, vibrant look along with a hint of cake texture on the outside.
How to Serve Red Velvet Cheesecake Bites Recipe
Garnishes
Elevate your Red Velvet Cheesecake Bites Recipe by adding a sprinkling of crushed pecans or shaved white chocolate on top for extra texture and visual appeal. A dusting of powdered sugar or a drizzle of cream cheese glaze can also add that elegant finishing touch that makes these bites party-ready.
Side Dishes
These cheesecake bites shine on their own, but pairing them with fresh berries or a small serving of whipped cream can take the experience to another level. A cup of rich coffee or a glass of cold milk also complements their flavors beautifully.
Creative Ways to Present
For a festive twist, serve your Red Velvet Cheesecake Bites Recipe on a tiered dessert stand at holidays or special occasions. You could also skewer them on decorative picks for easy party serving or arrange them around a decorated cake for a show-stopping dessert table.
Make Ahead and Storage
Storing Leftovers
Keep your cheesecake bites fresh by storing them in an airtight container in the refrigerator. They will stay delicious for up to 4 days, giving you plenty of time to savor these treats without any loss of flavor or texture.
Freezing
If you want to prep in advance, these bites freeze very well! Place them in a freezer-safe container with parchment paper between layers to prevent sticking. Thaw overnight in the fridge before serving, and enjoy the same creamy decadence as fresh.
Reheating
Since these bites are best served chilled, there’s no need to reheat. However, if you prefer them slightly less cold, simply let them sit at room temperature for 10-15 minutes before diving in.
FAQs
Can I use homemade red velvet cake instead of the mix?
Absolutely! Using homemade cake works wonderfully and adds a personal touch. Just make sure your cake is fully cooled and dry enough to crumble correctly for coating the bites.
What if I don’t have graham crackers?
You can substitute graham crackers with digestive biscuits, vanilla wafers, or even crushed nuts for a different but delicious texture and flavor in the cheesecake mixture.
How long do these bites keep in the refrigerator?
Stored in an airtight container, they usually stay fresh and tasty for up to 4 days, making them perfect for making ahead of an event or enjoying as a midweek treat.
Can I make these bites vegan or dairy-free?
With some ingredient swaps like vegan cream cheese and dairy-free butter alternatives, you can absolutely adapt this Red Velvet Cheesecake Bites Recipe to be vegan or dairy-free while retaining much of the original charm.
Is it necessary to chill the bites before coating them?
Chilling helps the bites firm up so they hold their shape and makes rolling in the cake crumbs much easier. Skipping this step might cause them to be too soft and sticky to coat nicely.
Final Thoughts
There’s something truly special about the Red Velvet Cheesecake Bites Recipe that makes it impossible not to fall in love at first bite. Whether you’re treating yourself or surprising guests, these vibrant, creamy, and indulgent morsels are bound to make any occasion sweeter. Give this recipe a try and watch how quickly these delightful bites disappear—trust me, you’ll want to keep this one in your dessert arsenal forever.
Print
Red Velvet Cheesecake Bites Recipe
- Prep Time: 15 minutes
- Cook Time: 30 minutes
- Total Time: 1 hour 45 minutes (including chilling time)
- Yield: Approximately 24 servings
- Category: Dessert
- Method: Baking
- Cuisine: American
Description
Delightful Red Velvet Cheesecake Bites combine the rich flavors of classic red velvet cake with a creamy cheesecake center coated in a crunchy graham cracker crust. These bite-sized treats are perfect for parties or a sweet snack, offering a smooth, luscious texture and vibrant color in every bite.
Ingredients
Cake:
- 1 box red velvet cake mix
- Ingredients required on cake mix packaging (usually eggs, oil, and water)
Cheesecake Filling:
- 16 ounces cream cheese, room temperature
- 4 tablespoons butter, room temperature
- 1/2 cup powdered sugar
- 1 teaspoon vanilla extract
- 2 cups graham crackers, crushed
Instructions
- Preheat and Prepare Pans: Preheat your oven to 350°F (175°C) and grease two 8-inch cake pans to prevent sticking.
- Bake Red Velvet Cake: Prepare the red velvet cake batter according to the package instructions, incorporating any additional ingredients needed such as eggs, oil, and water. Pour into prepared pans, bake as directed, then allow the cakes to cool completely on a wire rack.
- Crumble and Dry Cake: Once cooled, crumble the cake into coarse pieces using your hands or a fork. If the cake is too moist to handle, spread the crumbs on a baking sheet and dry them out in the oven for a few minutes to achieve a crumbly texture.
- Make Cheesecake Mixture: In a mixing bowl, beat the cream cheese, softened butter, and powdered sugar together until the mixture is smooth and fluffy, ensuring no lumps remain.
- Add Graham Crackers and Vanilla: Fold the crushed graham crackers and vanilla extract into the cream cheese mixture, mixing thoroughly until well combined to form a thick dough-like consistency.
- Form Bites and Chill: Scoop out portions of the mixture and roll them into 1-inch balls. Place the balls on a tray and refrigerate them for at least one hour to firm up.
- Coat with Cake Crumbs: After chilling, roll each cheesecake ball in the reserved red velvet cake crumbs until evenly coated for a beautiful and tasty finish. Serve chilled.
Notes
- Ensure cream cheese and butter are fully softened at room temperature to get a smooth, lump-free mixture.
- If the cake crumbs are still moist after baking, dry them out thoroughly to prevent the cheesecake bites from becoming soggy.
- Store the cheesecake bites in an airtight container in the refrigerator for up to 3 days.
- For extra decoration, you can drizzle melted white chocolate or add sprinkles on top after coating with crumbs.
